
Resin flooring RAMS Builder
Resin flooring risk assessment and method statement
Checking this browser for your work…
RAMS review
Check a RAMS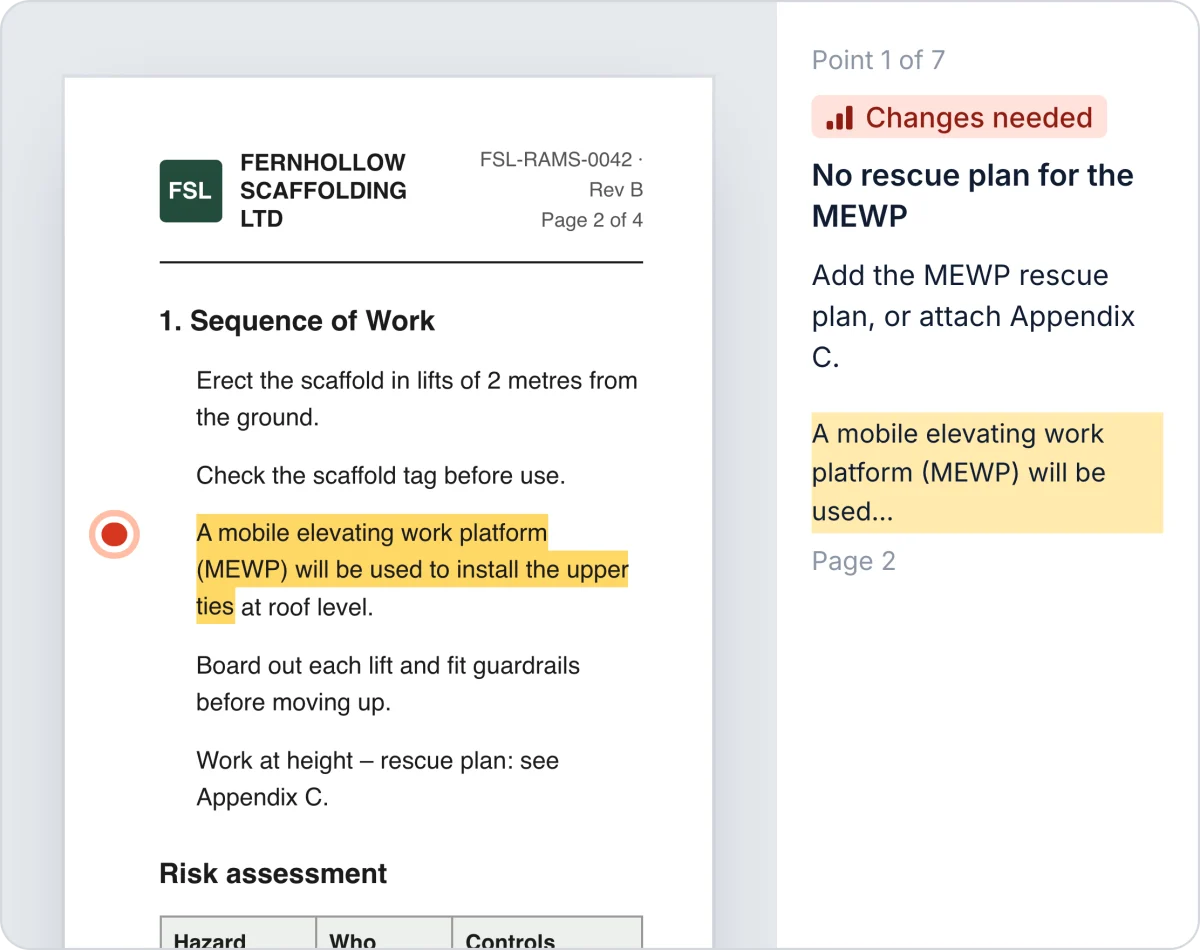
Resin flooring RAMS template
A blank resin flooring RAMS to fill in: job details, method statement, risk assessment and briefing record.
Risk assessment and method statement
Resin flooring RAMS
- Company
- left blank to fill in
- Site and work area
- left blank to fill in
- Planned dates
- left blank to fill in
- In charge on site
- left blank to fill in
- Team
- left blank to fill in
Method statement
- 1
- 2
- 3
- 4
- 5
- 6
Risk assessment
| Hazard | Who might be harmed and how | Controls in place | Further action |
|---|---|---|---|
Resin flooring RAMS example
The same RAMS, filled in for one job.
Risk assessment and method statement
Resin flooring, Unit 3, Canal Side Business Park, Stockport
Risk assessment
People entering the work area or tripping over materials
Workers, occupants and visitors
Mark or barrier the active work area. Store tools and materials away from access routes.
The wrong product or conditions leave a failed coating or expose workers
Resin flooring team and nearby workers
Use the identified product label and technical information for this job.
Breathing asbestos fibres from old boards, sheets, sealants or insulation
The team and anyone in the building
Do not cut, drill or break any material until it is confirmed asbestos free. Licensed work is not for this method; hand it to a licensed contractor.
Back and shoulder injury from carrying heavy or long items
Everyone handling materials
Use a trolley or sack truck on the flat where the load suits one. Where the work is up a level, hand items up or hoist them. Never carry them up a ladder.
Resin and hardener can irritate or sensitise skin
Resin flooring team
Use the COSHH controls for the actual products and task. Keep food and drink away from the work.
The coating debonds from a dirty, weak or damp floor
Resin flooring team and floor users
Do not coat over a floor that is not clean, dry and sound. Keep repair products within their own instructions.
Dust spoils adhesion and can damage workers’ lungs
Resin team and other workers
Use suitable extraction and keep other people out of the dust.
Wrong mixing leaves soft resin or splashes hardener onto skin and eyes
Resin flooring team
Use the product mixer, speed, ratio and mixing time. Keep the mixing area tidy and wear the stated protection.
Uneven coverage or early traffic leaves a weak, slippery or uncured floor
Resin team and anyone using the floor later
Follow the product coverage and cure times. Keep the work area fenced while the surface is wet.
Debris, tools or unfinished work left in the area
Workers, occupants and visitors
Remove waste by the agreed route. Record and protect any unfinished work.
Resin flooring, Unit 3, Canal Side Business Park, Stockport
- Company
- Hollins & Reed Contracting Ltd
- Site and work area
- Unit 3, Canal Side Business Park, Stockport
- Planned dates
- 12 to 14 October 2026
- In charge on site
- Dan Hollins
- Team
- Two operatives: Dan Hollins leads and checks the area each morning; Priya Shah works with him.
Method statement
- 1Set up the work areaConfirm the work area and scope before starting. Keep other people outside the active work area. Keep entrances and escape routes clear.
- 2Check the product and floor conditionsCheck this job's resin system, floor condition, temperature and moisture limits before you start. Stop if the product instructions do not match the floor or the room.
- 3Check for asbestos before you disturb anythingCheck the asbestos survey covers exactly what you will disturb, to the full depth. Register only, or nothing: get a refurbishment survey or a sample first. Read what it says about old floor tiles, floor finishes and adhesives. No survey, or a material you do not recognise: stop and get it checked.
- 4Carry the resin packs and bags safelyPlan the route, clear it, and get help with anything long or heavy. Store materials close to the work so nobody carries further than they need to.
- 5Control resin and hardener contactRead the labels and SDSs before opening components and brief everyone handling them. Use the agreed gloves, clothing and splash controls; wash contamination promptly.
- 6Prepare a clean, sound floorRemove dirt, oil, laitance, loose material and old coating that the product does not allow. Complete agreed repairs and let them reach the required condition before coating.
- 7Vacuum the floor before coatingUse vacuum extraction to remove dust after preparation. Do not dry sweep dust into the room or into the coating.
- 8Mix the resin to the product instructionsMeasure or use the supplied components in the stated ratio and mix for the stated time. Keep the paddle slow and submerged so it does not throw resin into the air.
- 9Apply the primer or coat evenlySpread the mixed resin at the stated coverage and work to the wet edge. Leave the coat for the stated recoat or cure time before the next layer.
- 10Clear and hand back the areaRemove tools, waste and unused materials. Check the area is clean and ready to use. Tell the customer or whoever runs the site when the work is complete.
What a resin flooring RAMS covers
Preparing the base, priming, rolling on resin coats, and broadcasting aggregate before sealing. Not covered: stripping out a failed resin floor.
- Prime and coat resin
- Apply broadcast resin
Suggested steps and hazards for resin flooring
Suggested for prime and coat resin before any questions are answered.
Check the product and floor conditions
- Check this job's resin system, floor condition, temperature and moisture limits before you start.
- Stop if the product instructions do not match the floor or the room.
Hazard
The wrong product or conditions leave a failed coating or expose workers.
Who might be harmed and how
Resin flooring team and nearby workers
Controls in place
- Use the identified product label and technical information for this job.
Resin only bonds and cures properly within the product conditions.
Sikafloor®-156 Control resin and hardener contact
- Read the labels and SDSs before opening components and brief everyone handling them.
- Use the agreed gloves, clothing and splash controls; wash contamination promptly.
Hazard
Resin and hardener can irritate or sensitise skin.
Who might be harmed and how
Resin flooring team
Controls in place
- Use the COSHH controls for the actual products and task.
- Keep food and drink away from the work.
Keeping resin off skin reduces dermatitis and sensitisation.
Chemical safety data sheets Prepare a clean, sound floor
- Remove dirt, oil, laitance, loose material and old coating that the product does not allow.
- Complete agreed repairs and let them reach the required condition before coating.
Hazard
The coating debonds from a dirty, weak or damp floor.
Who might be harmed and how
Resin flooring team and floor users
Controls in place
- Do not coat over a floor that is not clean, dry and sound.
- Keep repair products within their own instructions.
A sound prepared floor gives the resin a surface it can bond to.
Sikafloor®-156
What the builder asks about resin flooring
Your answers decide which steps, hazards and controls it suggests.
The job
- What resin system is specified?
- Is the floor ready for resin?
Where
- Has the floor moisture been checked?
- Is the building older than the year 2000? Older buildings can have asbestos in them.
- Who can enter while the resin cures?
How it’s done
- What will you stand on to reach the work?
- How will you mix the resin?
- What finish is specified?
- How will the resin packs and bags get to the work?
What your resin flooring RAMS includes
Method statement
The work in order, step by step.
Risk assessment
Each hazard, who could be harmed, the controls in place and any further action.
The method statement and risk assessment in one A4 PDF. Your logo on Pro and Team.
What the law asks for
What a RAMS is
A risk assessment and method statement. The risk assessment records what could cause harm on the job, who could be harmed and how, and the controls that keep the risk down. The method statement sets out how the work will be done, step by step, in the order it happens.
A client or main contractor will usually ask for one before you start. RAMS is a site term, not a legal one: the law asks for the risk assessment and for the work to be planned, and a method statement is the usual way to show that plan for one job.
What the law asks for
- Employers, and self-employed people doing construction work, must make a suitable and sufficient assessment of the risks to their own people and to anyone else affected by the work (Management of Health and Safety at Work Regulations 1999, regulation 3).
- An employer with five or more employees must record the significant findings and any group of employees it finds especially at risk. The assessment must be reviewed if there is reason to think it is no longer valid, or the work has changed significantly.
- Every contractor must plan, manage and monitor its work so that, so far as is reasonably practicable, it is done without risks to health and safety, and must give its workers the information and instructions they need, including the hazards the risk assessment found (Construction (Design and Management) Regulations 2015, regulation 15).
HSE guidance: the steps to manage risk and what contractors must do under CDM. This is the law in Great Britain; Northern Ireland has its own equivalent regulations.
What the builder does
You choose the work and answer questions about how the job will be done, such as what you will stand on and what else is going on nearby. Your answers decide which steps, hazards and controls it suggests.
Many suggestions link to the HSE guidance they draw on. Your work is kept in this browser and, signed in, on your account with its photos; the PDF is made on your device. A briefing you send to phones goes through your account.
Separate documents
A COSHH assessment, lifting plan, permit to work, asbestos survey and the principal contractor’s construction phase plan are separate from the RAMS.
Reviewing a RAMS before work starts
RAMS review reads a RAMS PDF, yours before you send it or one a subcontractor sends you, and lists the points to raise, each marked on the page it comes from. Quick reviews are free.